You may open both the Keyboard Definition window and the Keyboard Layout window at the same time.
Keyboard Definition
To understand how to use this module, you may load 'ukdvorak.kpt' file that
is for UK Dvorak keyboard. A keyboard definition consists of two tables: Key
Table and Char Table. Field 'Value' of the Key Table and field 'KeyNo' of the
Char Table link both tables. One key could be associated with many characters.
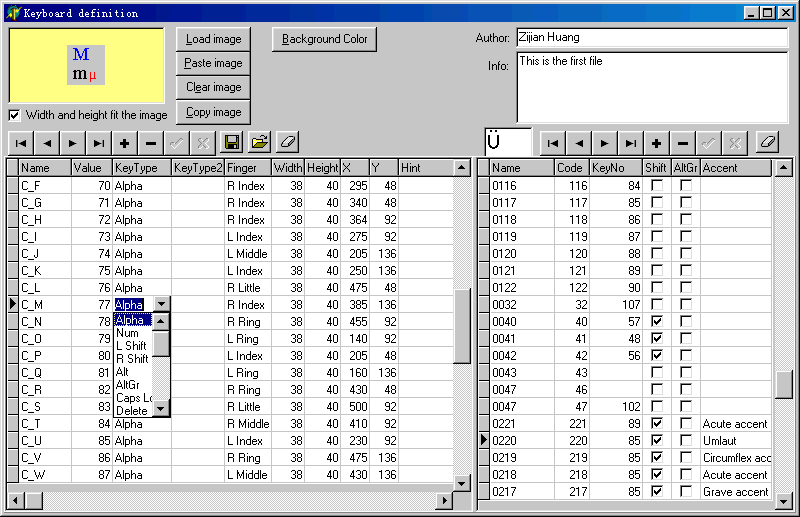
Definition of each filed of the Key Table:
| Field Name | Comment |
|
Name |
Name of the key. The table is sorted by this field by default. |
|
Value |
A number representing the key. Though some of the numbers look the same as those in the Virtual-Key Codes defined by the Microsoft Windows operating system, it is not mandatory to match these numbers with the Virtual-Key Codes of Windows. The number will be linked / associated with field 'KeyNo' of the Char Table. |
|
Key Type |
There are three groups of type: Character, Action and Accent. Types of Character are 'Alpha' and 'Num'. Types of Action are 'L Shift', 'AltGr', and 'Backspace' etc. Types or Accent are 'GRAVE' and 'UMLAUT' etc. |
|
Key Type2 |
Normally you define a type of Accent here. For example, Key Zero is a key to input '0' and ')'; the key is also an accent key by pressing 'AltGr' and the key. |
|
Finger |
Indicate which finger should press the key. |
|
X, Y |
Location of a key in the keyboard |
|
Hint |
Hint that appears when the mouse pointer is over a key. |
|
Width,Height |
Width and Height of a key. |
|
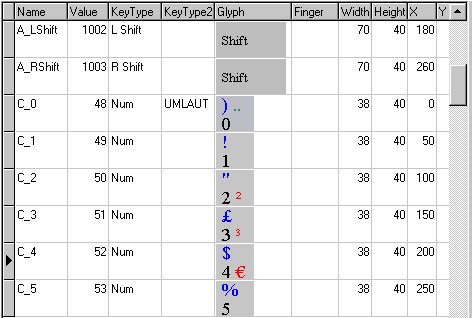
Glyph |
Bitmap image representing the key |
Note: The width and height may be modified after pasting a bitmap for the key, if 'Width and height fit the image' checkbox is checked.
Definition of the Char table:
| Field Name | Comment |
|
Name |
Identifier of the char. You may name it after the ASCII code of the char, or any name. |
|
Code |
ASCII code of the char |
|
Key No |
Which key to use to get the char. This associate a char with a key. |
|
Shift |
Whether the char need the Shift key to produce. |
|
AltGr |
Whether the char need the Dead AltGr to produce |
|
Accent |
Tips of navigating the tables: Upon the grids of the key table, you may enlarge the height of each row and the width of each column as you can do in MS-Excel. You may change the order of columns by dragging the column title.
By clicking on the title tag of a column, the table will be sorted by the column.
Note: With the Char table, it is not mandatory to define 'Shift', 'AltGr' and 'Accent' fields. Current version of KP Typing Tutor only highlights one key at a time, the tutor doesn't use these fields. However, in the future, I might upgrade the tutor to provide such feature: when a learner is going to type an accent letter, the tutor will highlight the accent key and the major key, plus an optional Shift key. In addition, if you define 'Shift', 'AltGr' and 'Accent' fields, you might have fun by playing the on-screen keyboard around.
Keyboard Layout
In this module, you may change the locations of each key and test the definition of each key. You can open this window and the Keyboard Definition Window at the same time.
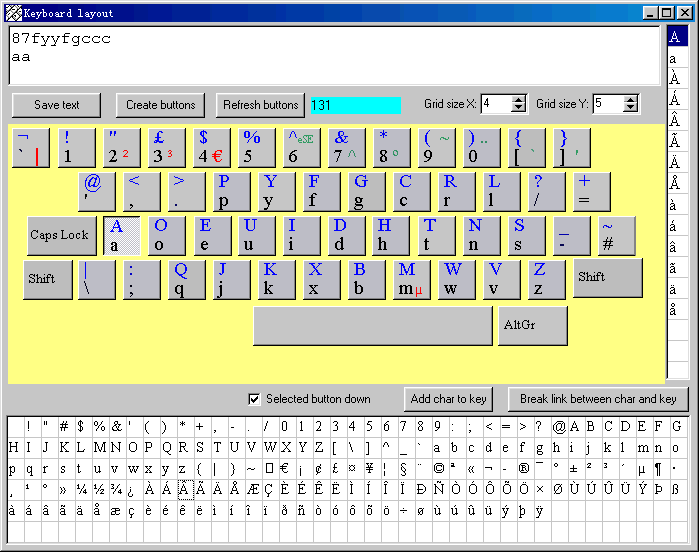
Since you already defined each key is linked with several characters, you may click the keys represented by buttons and you will see the characters are printed in the edit box on the top. You may even try 'Caps Lock', 'Shift' and 'AltGr' keys, if you defined 'Shift', 'AltGr' and 'Accent' fields in the Char table.
Though you may define the location of each key in the 'Keyboard Definition' module, it might be more convenient to change the locations by drag &drop operations. To do so, put the mouse pointer over a key, press the right button, drag the key to wherever you want, then release the mouse button. To beautifully align the keys, you may change the Grid size X and the Grid size Y.
If you hold the 'Ctrl' key and right-click a key, you will get the 'Keyboard Definition' window and the Key Table is relocated to the key's definition.
If you think it is too technical to link characters with a key in the Keyboard Definition Window, you may actually create the links in this Keyboard Layout Window. Just click a key to select, and click a character from the grids below, then press the 'Add char to key' button. Done.
Tips: Open both the Keyboard Definition window and the Keyboard Layout window at the same time. When you click one of the characters in the char grids in the Keyboard window, the char table in the Table window will locate the character.
Finger Definition
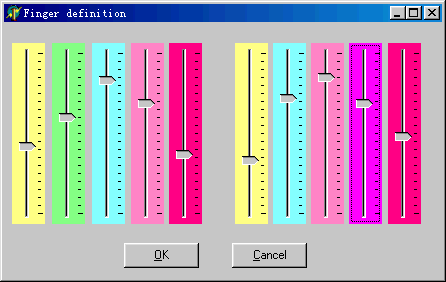
In the module, you may change the length and the color of each finger of both hands. To change the color, just right-click any column representing a finger. If the lengths of all fingers of a hand are zero, KP Typing Tutor won't show the hand in order the make more sense for single-handed typing.
Note:
Before you define a new on-screen keyboard, generally you may start from one of the *.kpt files in the software package. You may find the following files in the installation folder:
- QwertySmall.kpt
- UkDvorakSmall.kpt
- DvorakLeft.kpt
- DvorakRight.kpt
- More *.kpt files
When you later make a typing course, you may mention why you make such typing
course in the readme.txt file under the sub-folder of the course, since there
might be a lot versions of typing courses, so people may choose the one that
meets their needs.