Edit Contact Details
Open Contacts supports unlimited data fields for storing contact data. Data fields of each contacts are organized by section. For fast input of contact data, Open Contacts provides a set of handy functions as described below:
- Input name
- Add field
- Change field name
- Delete field
- Add section
- Change section name
- Delete section
- Define notes of a section
- Paste multiple lines of text to create fields
Input name
For each personal contact, Open Contacts store full name, surname, given name and middle name, even if under some settings the surname fields and the given name field may be hidden.
When inserting a new individual contact, after you fill in the Full Name field, then the Surname field, the Given name field and the Middle Name field will be filled in automatically. When you modify these name fields, the change will be reflected back to the Full Name filed.
However, when you modify a saved record, changes on these name fields will not be reflected back to the Full Name field.
Related settings:
- Options -> View -> Displayed name fields
- Options -> View -> Compact UI
- Options -> View -> Sort by surname when listing people
Add new field
To add a field as the first field of a section, place the focus in the section name, then press Ctrl+F. Then key-in the desired field name or select one from the drop down list. And then press the Tab key to move to the edit box of the new field.
To add a field below the other field, place the focus in the other field, then press Ctrl+F.
Related settings:
- Predefined fields
- Options -> General -> Auto-complete with some fields
- Options -> General -> Tab stop at field names
- Options -> General -> Date
- Options -> New Contact
- Predefined labels
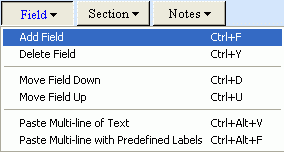
Change field name
Place the focus in the field name, either key-in field name or pick up one from the drop down list.
Related settings:
- Options -> View -> Field drop down count

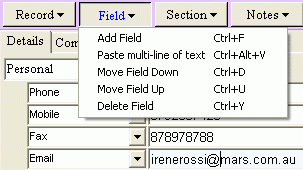
Delete field
To delete a field, simply clear the value of the field. After saving the record, data fields with empty value will be removed.
Move field up or down
To move a field up or down, place the focus on either the field name or the value of the field, then press "Ctrl+U" or "Ctrl+D".
Change section name
Simply type in a section name you want. Please do not define two sections with the same name.
Add section
To add a new empty section, you may press "Ctrl+ G". Alternatively, you could create a predefined section by selecting one from the Predefined Section List.
To add a section before current section, place the focus on current section name then run "Add Section".
To add a section after current section, just place the focus on any field of current section then run "Add Section".
If there is no current section selected, new section will be added as the last section.
Related settings:
- Predefined Sections
- Options -> New Contact
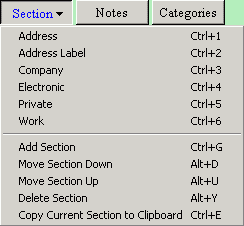
Delete section
To delete a section, simply clear the section name. When you save the record, data fields of the section will be all removed as well. In addition, if the values of all data fields of the section are empty, the section will be deleted after saving the record.
Move section up or down
To move a section up or down, select the section by placing the focus on the section name or a field within the section, then press "Alt+U" or "Alt+D".
Define notes of section
Each section could have a Notes field to store multiple lines of text. To define the notes of a section, place the focus on the section and press "Ctrl + M". To get a larger window for editing a notes field, place the focus on the notes field, and press shortcut "Alt + M".
When you save the record, if the content of the notes field is empty, the notes field will be removed.